
Salesforce satisfaction ratings integration instructions
Embedded Thermometer Overview
In the short video below, we take you through an overview of Embedded Thermometers. In tab 2, we get more specific on how to integrate with Salesforce.com
How to embed feedback buttons into your Salesforce workflow
If you are a Customer Thermometer account holder (Jumper account or above) and a Salesforce user with admin rights, then you now have everything you need to add 1-click surveys to your support or account management workflows.
In the video demo below,we show you how to create an Embedded Thermometer and then integrate the HTML code generated into the Email template section of your Salesforce account to enable you to send automated one-click surveys to your Salesforce contacts.
You will see a slightly different look and feel to the app now and the Thermometer build screen is now split into two tabs.
There were no changes to the functionality or this process.
How to write back CT ratings into your Salesforce account
NOTE: THIS FUNCTIONALITY REQUIRES A SALESFORCE ENTERPRISE ACCOUNT
AS IT RELIES ON WORKFLOWS
In this example, we’re going to look at writing back a rating against a Case object. Whilst there are many steps to run through – it’s possible many of them will already be set up within your instance. You may be able to skip through a few elements.
Note the write back of data relies on Customer Thermometer’s email alerts being sent into Salesforce, parsed for the Thread ID and then running rules associated with the case.
Once complete, you will be able to view screens similar to this:
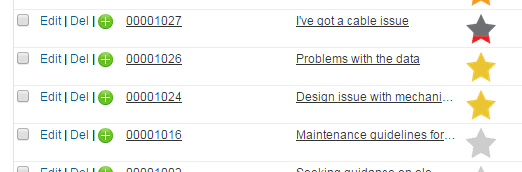
Step 1 – Enable Email to Case
Visit BUILD > Customize > Cases > Email-to-Case
Enable this feature if it isn’t already enabled.
Set up a forwarding address within your email system – typically this will be an address such as [email protected]. It’ll forward to the SF generated address which looks something like:

This will also need to be verified. Note you could use this Saleforce generated Email Services Address – it’s just not overly elegant!
This will ensure that alert emails sent from Customer Thermometer, following a response, will be routed into your Salesforce account.
Whichever address you choose to use – make a note of it – we’ll need it right at the end.
Step 2 – Set up relevant custom fields
In this example, we’re adding CT ratings to the Case object. Note you could add ratings to anywhere inside Salesforce.
We need to set up the relevant Case Custom Fields first of all.
Visit BUILD > Customize > Cases > Fields
Set up a new Picklist field. We’ve called it CT rating – it can of course be called anything you like.
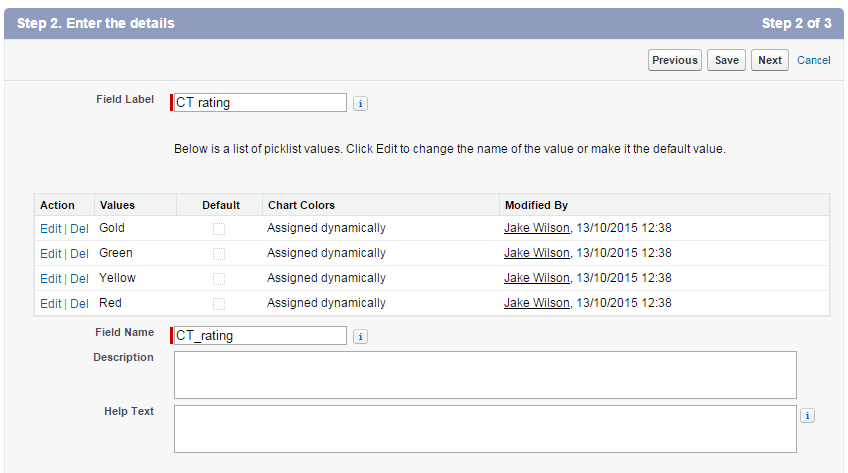
Make sure it’s visible in the relevant screens of course.
Step 3 – Set up Workflow Rules
Visit BUILD > Create > Workflow & Approvals > Workflow Rules
In this area, we need to set up four different Rules, which set the case rating field just set up, to the correct rating.
Each one should look like this:
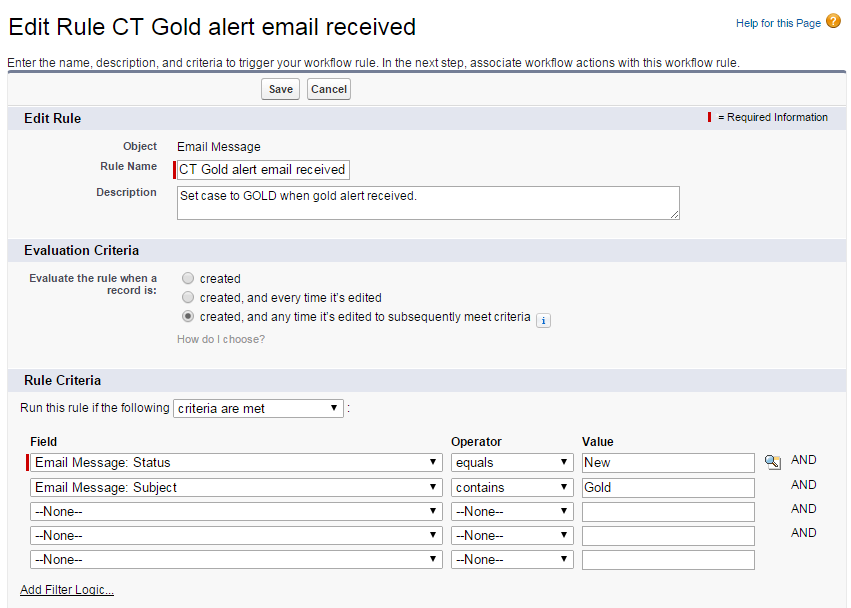
By skipping through the wizard, you’ll then need to add an action to each rule. In this case, the action is a Field Update:
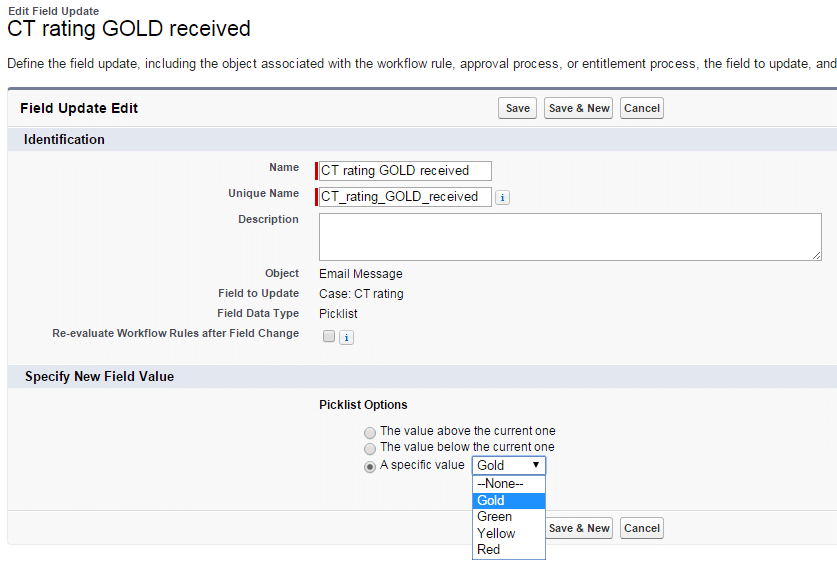
This needs to be repeated for all 4 rating types. ENSURE YOU ACTIVATE EACH ONE – THEY ARE DEACTIVATED BY DEFAULT!
To sumarise, what’s happening here is that if Salesforce receives an email alert from Customer Thermometer with “Gold” in the subject, then the CT Rating field registered against each Case object should change it’s value to Gold from whatever it was before.
Step 4 – Adding Feedback buttons to the Case Thread responses
Refer to the video in Tab 2 for this.
Essentially, you will need to create an Email Communication Template – CT Signature. This will contain the 4 feedback rating buttons, each with a unique hyperlink.
It will look something like this – and note the blue squares will not appear in the email when sent.
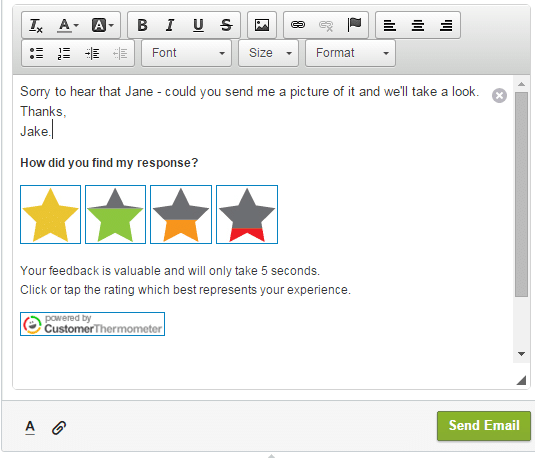
When you come to generating the embed code, use the following Salesforce variables:
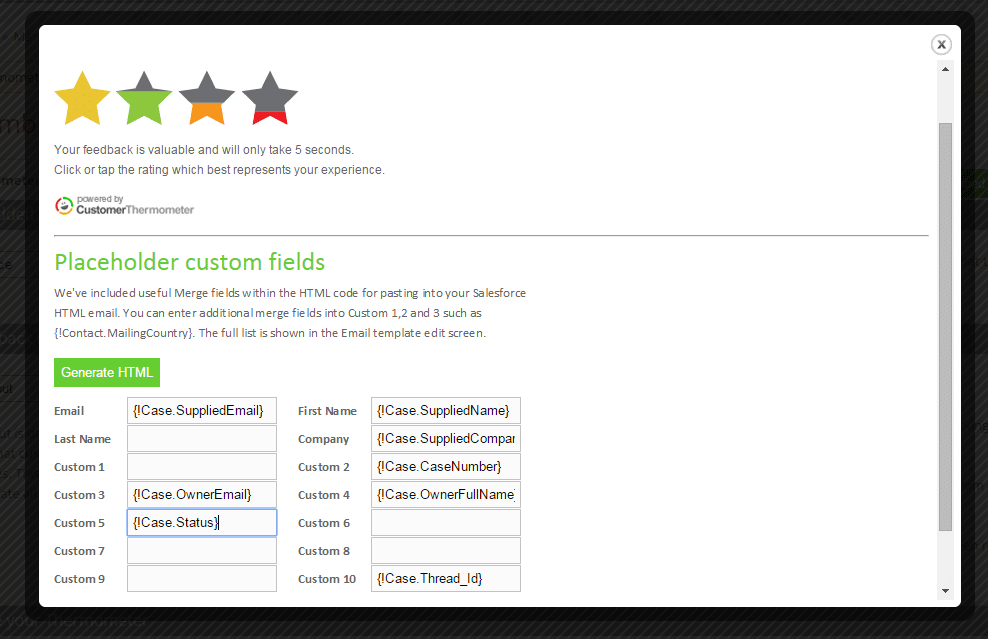
Note the Case.Supplied variables will probably be the most useful (depending on how you set up Salesforce and use the workflows). This should ensure you get useful response data registered inside Customer Thermometer.
Note too – the key to success here is including the Case.Thread_Id. This is a unique code, which will ensure the Alert Emails route into the correct Case object, courtesy of Salesforce’s parsing engine. We’ve suggested putting in in Custom 10, so that this reference doesn’t appear on your CT reporting screens (only fields up to Custom 3 appear).
Step 5 – Finishing touches – adding icons instead of text ratings
This is a nice to have, but nonetheless is a powerful addition.
In order to create a ratings field with graphical representation of the ratings, instead of a textual one, you will need to create a second custom field in the Case Object. This will then be directly linked, via formula to the original CT Rating field, we created earlier. Let’s see how it’s done.
Visit BUILD > Customize > Cases > Fields
Set up a new Formula (Text) field. We’ve called it CT Temperature – it can of course be called anything you like.
In the formula area, enter the following code:
CASE(1,
 If(CONTAINS(Text(CT_rating__c),"Gold"),1,0),
 IMAGE("/resource/CTGold","Gold",30,30),
 If(CONTAINS(Text(CT_rating__c),"Green"),1,0),
 IMAGE("/resource/CTGreen","Green",30,30),
 If(CONTAINS(Text(CT_rating__c),"Yellow"),1,0),
 IMAGE("/resource/CTYellow","Yellow",30,30),
 If(CONTAINS(Text(CT_rating__c),"Red"),1,0),
 IMAGE("/resource/CTRed","Red",30,30),
 IMAGE("/resource/CTNone","None",30,30)
 )
Save that field and then you’ll need to upload the 5 icons which the Formula refers to.
This area is nicely hidden away in BUILD > Develop > Static Resources
Firstly, download each of the 5 images below to your hard drive, by right clicking and choosing “file save as” (or the equivalent).


Finally, click ‘NEW’ in that Static Resources screen and then upload each image separately, ensuring you name them exactly the same as they are referred to in the Formula above.
FINAL STEP
Your Salesforce setup is complete. Each time a response is received by Customer Thermometer, you will need to trigger an email alert.
All that’s left to do now is to go back into your Customer Thermometer account and edit the Salesforce Thermometer you set up in Step 4.
Go to your Email Alert notifications area and enter the Salesforce address from Step 1 above. Ensure all boxes are ticked:
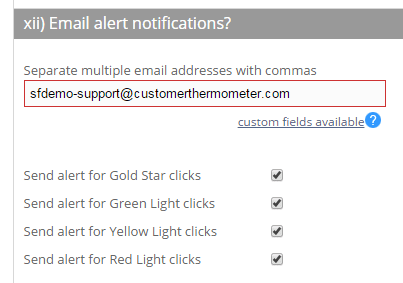
Save your Thermometer and then test your workflow.
To help – there’s a demo below explaining how the whole process comes together.
Bringing it all together in a demo.
To see this workflow in action, take a look at the short demo below: